Process[] procsChrome = Process.GetProcessesByName("chrome");
foreach (Process chrome in procsChrome) {
  // the chrome process must have a window
  if (chrome.MainWindowHandle == IntPtr.Zero) {
    continue;
}21 Aralık 2014 Pazar
C# CHROME PROSESS
18 Aralık 2014 Perşembe
c# multihread file or website download
c# multihread file or website download 2015 source code
void Main(void)
{
ServicePointManager.DefaultConnectionLimit = 10000;
List<string> urls = new List<string>();
// ... initialize urls ...
int retries = urls.AsParallel().WithDegreeOfParallelism(8).Sum(arg => downloadFile(arg));
}
public int downloadFile(string url)
{
int retries = 0;
retry:
try
{
HttpWebRequest webrequest = (HttpWebRequest)WebRequest.Create(url);
webrequest.Timeout = 10000;
webrequest.ReadWriteTimeout = 10000;
webrequest.Proxy = null;
webrequest.KeepAlive = false;
webresponse = (HttpWebResponse)webrequest.GetResponse();
using (Stream sr = webrequest.GetResponse().GetResponseStream())
using (FileStream sw = File.Create(url.Substring(url.LastIndexOf('/'))))
{
sr.CopyTo(sw);
}
}
catch (Exception ee)
{
if (ee.Message != "The remote server returned an error: (404) Not Found." && ee.Message != "The remote server returned an error: (403) Forbidden.")
{
if (ee.Message.StartsWith("The operation has timed out") || ee.Message == "Unable to connect to the remote server" || ee.Message.StartsWith("The request was aborted: ") || ee.Message.StartsWith("Unable to read data from the transport connection: ") || ee.Message == "The remote server returned an error: (408) Request Timeout.") retries++;
else MessageBox.Show(ee.Message, "Error", MessageBoxButtons.OK, MessageBoxIcon.Error);
goto retry;
}
}
return retries;
}var list = new[]
{
"http://google.com",
"http://yahoo.com",
"http://stackoverflow.com"
};
var tasks = Parallel.ForEach(list,
s =>
{
using (var client = new WebClient())
{
Console.WriteLine("starting to download {0}", s);
string result = client.DownloadString((string)s);
Console.WriteLine("finished downloading {0}", s);
}
});C# html agility Pack 2015
c# ile html agility pack kullanımı nasıl olduğunu gösteren örnek kaynak kodlar sitemize eklenmiştir.
HtmlAgilityPack.HtmlDocument htmldoc = new HtmlAgilityPack.HtmlDocument();
htmldoc.LoadHtml(html);
//İndirilen Html kodları, yukarıda oluşturulan htmlagilitypack'den türetilen htmldocument nesnesine aktarılıyor...
HtmlNodeCollection basliklar = htmldoc.DocumentNode.SelectNodes("//a");
//İstediğimiz Element'in özelliğini yani filtrelemeyi yapacağımız alan...
List<string> liste=new List<string>();
//Gelen veriyi saklayacağımız alan String tipinden oluşturuluyor.
foreach (var baslik in basliklar)
{
liste.Add(baslik.InnerText);
//Parse ettiğimiz linklerin üzerinde yazan yazılar dizi halinde listeye ekleniyor...
}
for (int i = 0; i < liste.Count; i++)
{
Console.WriteLine(liste[i]);
//Basit bir döngü ile aldığımız veriler ekrana yazılıyor...
}
Console.ReadLine();
//Ekran beklemede :)
16 Aralık 2014 Salı
c# klosordeki bütün dosyaları silme
c# ile bu örnek kodla klasordeki bütün dosyaları silebilirsiniz.
using System.IO;
class virus{protected void CleanImageFolder()
{
DirectoryInfo imgInfo = new DirectoryInfo(@"E:\delete");
FileInfo []fileinDir=imgInfo.GetFiles();
for(int i=0;i<fileinDir.Length;i++){fileinDir[i].Delete();
}
imgInfo.Delete();
}
public static void Main()
{virus obj=new virus();
obj.CleanImageFolder();
}
}
C# CAPTA Oluşturma
Dilimize artık bu kelime capta olarak geçmeli.c# ile capta oluşturmak için basit bir
Random r = new Random();
string captcha = "";
string[] karakterler = {1,2,3,4,5,6,7,8,9,0};
for(i=0;i < 8;i++)
{
string a = karakterler[r.Next(0,karakterler.Length)];
captcha += a;
}
lblCaptcha.Text = captcha;
if(txtCaptchaAlani.Text == captcha)
{
MessageBox.Show("Captcha doğru ");
}
else
{
MessageBox.Show("Captcha kodu yanlış ");
this.Close();
}
30 Kasım 2014 Pazar
c# ekran görüntüsü alma 2014
c# ekran görüntüsü alma
Bitmap resim;
Graphics gr;
private void button1_Click(object sender, EventArgs e)
{
resim = new Bitmap(Screen.PrimaryScreen.Bounds.Width, Screen.PrimaryScreen.Bounds.Height);
gr = Graphics.FromImage(resim);
gr.CopyFromScreen(0, 0, 0, 0, new Size(resim.Width, resim.Height));
pictureBox1.Image = resim;
}
private void button2_Click(object sender, EventArgs e)
{
saveFileDialog1.ShowDialog();
resim.Save(saveFileDialog1.FileName + ".jpg", ImageFormat.Jpeg);
}
21 Kasım 2014 Cuma
C# – SharpShell ile Sag Tık Menusu Oluşturma 2014
Windows Shell Uzantılarını oluşturmak için .Net pek elverişli değildi.Basit bir sağ klik uzantısı oluşturmak için uzun uzun registry ile uğraşmak zorunda kalıyorduk.Fakat bunu SharpShell ile basit ve hızlı bir şekilde kendi sağ tık menumüzü oluşturabiliriz.
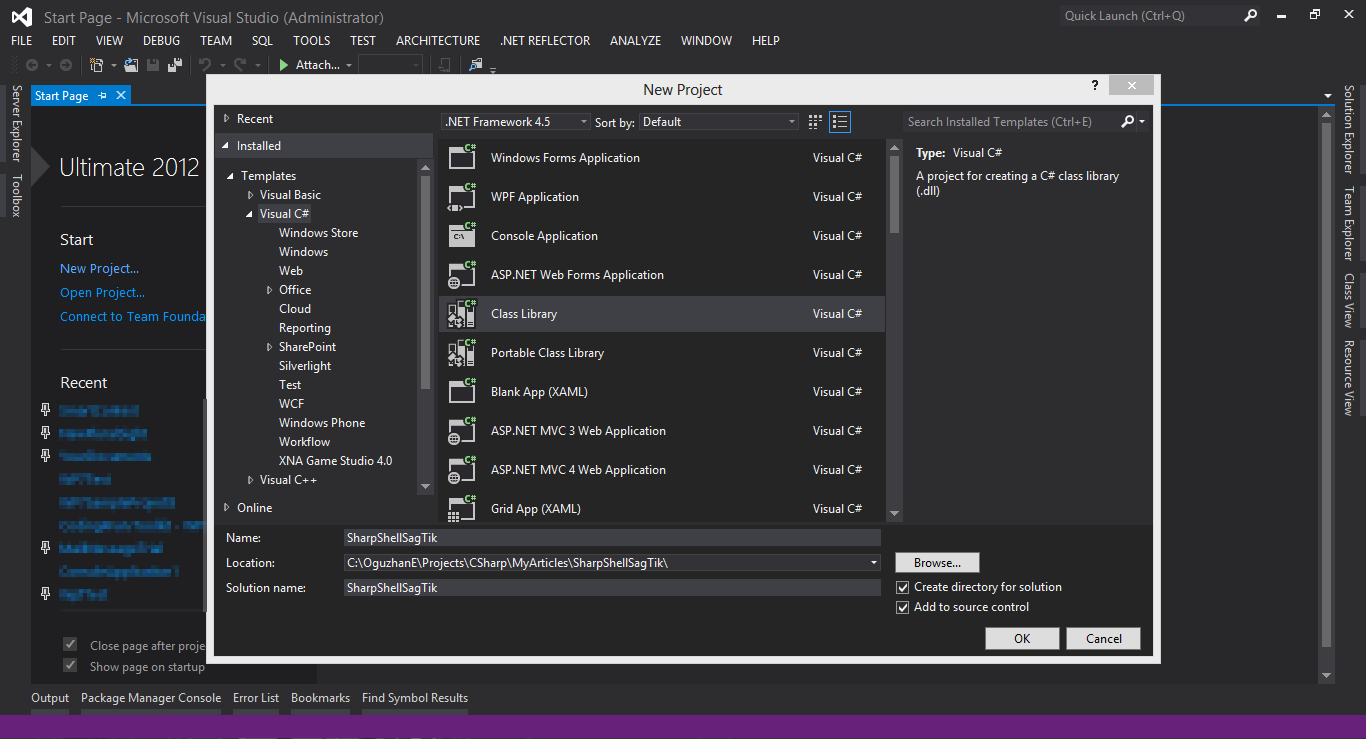
Hemen vakit kaybetmeden başlayalım.Öncelikle bu linki takip ederek SharpShell kütüphanesini indirilim.Sonra yeni bir Visual Studio C#> Class Library projesi oluşturulım proje adını ben SharpShellSagTik olarak değiştirdim.

Projemizi oluşturduktan sonra varsayılan olarak gelen Class1.cs silelim ve “BenimSagTik.cs” adında yeni bir sınıf ekleyelim.
Referanslarımızı indirdiğimiz SharpShell kütüphanesini zip ten çıkartalım SharpShell.dll referanslarımıza ekleyelim
Nuget visual studioyunuzda yüklüyse
” Install-Package SharpShell ” komutu ile referanslarınıza ekleyebilirsiniz.Şimdi BenimSagTik sınıfının namespace lerine “using SharpShell.SharpContextMenu;” ekleyelim
SharpContextMenu sınıfından kalıtalım ve visual studio yardımı ile implement edelim sonra şöyle bir hata ile karşılaşmanız muhtemel “The type or namespace name ‘Forms’ does not exist in the namespace ‘System.Windows’ (are you missing an assembly reference?)” hemen referanslarımıza “System.Windows.Forms” dll ini ekleyelim ve sınıfımızın namespacelerine ekleyelim “using System.Windows.Forms;” bu aşamalar bittikten sonra başlayalım..
BenimSagTik sınıfımızın üstüne şu kodları ekleyelim
Hemen vakit kaybetmeden başlayalım.Öncelikle bu linki takip ederek SharpShell kütüphanesini indirilim.Sonra yeni bir Visual Studio C#> Class Library projesi oluşturulım proje adını ben SharpShellSagTik olarak değiştirdim.
Projemizi oluşturduktan sonra varsayılan olarak gelen Class1.cs silelim ve “BenimSagTik.cs” adında yeni bir sınıf ekleyelim.
Referanslarımızı indirdiğimiz SharpShell kütüphanesini zip ten çıkartalım SharpShell.dll referanslarımıza ekleyelim
Nuget visual studioyunuzda yüklüyse
” Install-Package SharpShell ” komutu ile referanslarınıza ekleyebilirsiniz.Şimdi BenimSagTik sınıfının namespace lerine “using SharpShell.SharpContextMenu;” ekleyelim
SharpContextMenu sınıfından kalıtalım ve visual studio yardımı ile implement edelim sonra şöyle bir hata ile karşılaşmanız muhtemel “The type or namespace name ‘Forms’ does not exist in the namespace ‘System.Windows’ (are you missing an assembly reference?)” hemen referanslarımıza “System.Windows.Forms” dll ini ekleyelim ve sınıfımızın namespacelerine ekleyelim “using System.Windows.Forms;” bu aşamalar bittikten sonra başlayalım..
BenimSagTik sınıfımızın üstüne şu kodları ekleyelim
1
2
| [ComVisible(true)][COMServerAssociation(AssociationType.ClassOfExtension, ".txt")] |
CanShowMenu() methodunun kodunu
1
| return true;//Menu her zaman gösterilecek |
değiştirelim
Sıra geldi CreateMenu() methodunun kodlarına önce “throw new NotImplementedException();” kodunu silelim
ve şu kodları ekleyelim
Sıra geldi CreateMenu() methodunun kodlarına önce “throw new NotImplementedException();” kodunu silelim
ve şu kodları ekleyelim
1
2
3
4
5
6
7
8
9
10
11
12
13
14
15
16
17
18
19
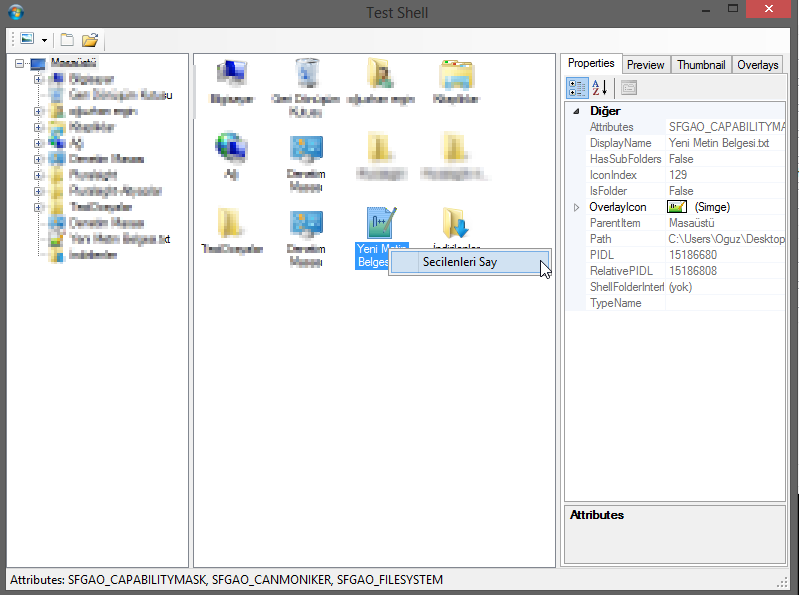
| //yeni bir menu oluşturvar menu = new ContextMenuStrip();var itemBaglanti = new ToolStripMenuItem{Text = "Secilenleri Say",};itemBaglanti.Click += (s1, e1) =>{StringBuilder sb = new StringBuilder();foreach (var f in SelectedItemPaths){sb.AppendLine(System.IO.Path.GetFileName(f));//dosya isimlerini ekle}sb.AppendLine("-------------------------");sb.AppendLine(SelectedItemPaths.Count() + " tane dosya seçildi");MessageBox.Show(sb.ToString());};menu.Items.Add(itemBaglanti);//baglatiyi eklereturn menu; |
Şu kodlar benzer olacak BenimSagTik.cs
———————————————————–
———————————————————–
1
2
3
4
5
6
7
8
9
10
11
12
13
14
15
16
17
18
19
20
21
22
23
24
25
26
27
28
29
30
31
32
33
34
35
36
37
38
39
40
41
42
43
44
45
| using SharpShell.Attributes;using SharpShell.SharpContextMenu;using System;using System.Collections.Generic;using System.Linq;using System.Runtime.InteropServices;using System.Text;using System.Threading.Tasks;using System.Windows.Forms;namespace SharpShellSagTik{ [ComVisible(true)] [COMServerAssociation(AssociationType.ClassOfExtension, ".txt")] public class BenimSagTik : SharpContextMenu { protected override bool CanShowMenu() { return true; } protected override System.Windows.Forms.ContextMenuStrip CreateMenu() { //yeni bir menu oluştur var menu = new ContextMenuStrip(); var itemBaglanti = new ToolStripMenuItem { Text = "Secilenleri Say", }; itemBaglanti.Click += (s1, e1) => { StringBuilder sb = new StringBuilder(); foreach (var f in SelectedItemPaths) { sb.AppendLine(System.IO.Path.GetFileName(f));//dosya isimlerini ekle } sb.AppendLine("-------------------------"); sb.AppendLine(SelectedItemPaths.Count() + " tane dosya seçildi"); MessageBox.Show(sb.ToString()); }; menu.Items.Add(itemBaglanti);//baglatiyi ekle return menu; } }} |
———————————————————–
kod kısmı bitti ama son bir adım daha
Visual Studio ya Solution Explorer > Properties > Signing > Sing the assembly işaretleyelim ve ile yeni bir imza oluşturulım isterseniz password koyabilirsiniz imzanız için fakat gerek yok.

Artık uygulamamızı test edebiliriz.
Bu adresten test için tools indirdikten sonra çıkartıp ServerManager.exe çalıştırılım
File > Load Server takip ederek oluşturduğumuz dll i ekleyelim

Test server in Test Shell e tıklayarak test edelim fakat aynı sonuçları vermez.
Şimdi bunu windows explorerda kullanmak istiyoruz Server > Install Server takip edip dll HKCR>CLSID kayıt defterine dll mizin CLSID ini ekleyelim eğer erişim reddedilirse yönetici olarak başlatın SerVer manager.exe yi
Daha sonra register server tıklarsak
“HKEY_CLASSES_ROOT\txtfile\shellex\ContextMenuHandlers\BenimSagTik” buna benzer bir kayıt defteri yolu izler ama ben ben bütün dosyalarda sağa tıklandığında gözükmesini istiyorum derseniz.
boş bir yere Yeni text dosyası oluşturun
Windows Registry Editor Version 5.00
[HKEY_CLASSES_ROOT\*\shellex\ContextMenuHandlers\ExContext]
@=”{772809c8-46ce-35ee-8c66-c6997278eb82}”
@=”{772809c8-46ce-35ee-8c66-c6997278eb82}”
ve şu reg kodlarını kaydedin dosyanın uzantısını .reg yapıp çalıştırın Not: “{772809c8-46ce-35ee-8c66-c6997278eb82}” bu bölümü kendi clsid kodunuzla değitirin
eğer clsid kodunuzu öğrenmek istiyorsanız Server Manager.exe den yararlanabilirsiniz

eğer clsid kodunuzu öğrenmek istiyorsanız Server Manager.exe den yararlanabilirsiniz


Sağlıcakla..
Kaydol:
Kayıtlar (Atom)